Steps to Upgrade MySQL to v8.4.8
This topic describes how to upgrade the QMetry application database and the QMetry Reports database to MySQL v8.4.8 on Linux servers that host QMetry in Docker containers.
Prerequisites
Before you upgrade, ensure that you meet the following prerequisites:
The MySQL version of both QMetry Reports and the QMetry application is 8.0.33 or later.
QMetry is not in use, and no operations or traffic are running on QMetry.
You have root or sudo access to the servers that host the database containers.
You have
QMetry_Linux_Installer.zip, which you receive from QMetry Support.For an online installation, you are logged in to the container registry with the credentials shared with your installation package. To log in, run docker login.
In case of Offline Installation
If your server has no internet access, download and restore the QMetry database container images first, and then continue with upgrade procedure for MySQL 8.4.8.
Download the Container Image of QMetry/Report DB
To download the container images, do the following on a machine that has internet access:
Log in to the container repository. If you do not have the credentials, contact QMetry Support.
docker login
Download and save the QMetry Database container image by executing these commands:
docker pull qmetry/qmetry:appdb848
docker pull qmetry/qmetry:reportdb848
docker images
docker save -o qmetrydb.tar qmetry/qmetry:appdb848
docker save -o reportdb8.tar qmetry/qmetry:reportdb848
ls
Transfer the
qmetrydb.tar,reportdb8.tarfile to the server where you will upgrade the databases.
Restore the Container Image of QMetry DB
To restore the container images, do the following on the server where you will upgrade the databases:
Go to the directory that contains qmetrydb.tar and reportdb8.tar, and then load the images.
docker load -i qmetrydb.tar
docker load -i reportdb8.tar
Verify that the images are restored.
docker images
Upgrade Procedure for MySQL 8.4.8
Complete Step 1 through Step 7 in order.
Step 1: Backup Your Existing QMetry Database
Important
Back up your databases before you continue. Keep the backup files until you validate the upgrade in Step 6.
Before proceeding, back up existing “qmetry” database. Adjust the username, password, and backup file location as needed (default location is /opt).
docker exec qmetryapp_db sh -c 'exec mysqldump -uroot -p<password> --triggers --routines --hex-blob --single-transaction --lock-tables --no-create-db qmetry' > /opt/qmetry_backup_<date>.sql
docker exec qmetryapp_db sh -c 'exec mysqldump -uroot -pqmetry --triggers --routines --hex-blob --single-transaction --lock-tables --no-create-db qmetry' > /opt/qmetry_backup_2023-01-01.sql
Step 2: Stop QMetry Services
To stop the QMetry application and report containers, do the following:
Run the following commands:
docker stop qmetry_app_1
docker stop qmetry-reports
List the running containers, and ensure that the database containers are running. The upgrade script requires the database container to be running.
docker ps
If a database container is not running, start it. For example:
   docker start qmetryapp_db
   docker start qmetry-reports-db
Step 3. Upgrade the QMetry Application Database
To upgrade the QMetry application database, do the following:
Copy
QMetry_Linux_Installer.zipto the server that hosts the QMetry application database container.Go to the directory that contains the file, and then extract it.
unzip QMetry_Linux_Installer.zip
cd QMetry_Linux_Installer.zip
Run the script.
   chmod +x upgrade.sh
   sudo sh upgrade.sh
At the QMetry Upgrade Menu, enter 1 to upgrade the QMetry application database.
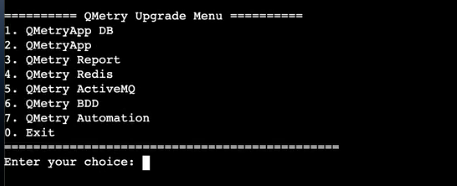
Enter the values described in the table that follows this procedure when the script asks for them, and wait until the upgrade finishes.
Options
Default Value
Description
Do you have QMetry's application container running on this machine? (Y/N)
Y
Enter N for a 3-tier installation.
Do you have QMetry's database container running on this machine? (Y/N)
Y
Enter Y for a 3-tier installation.
Enter the name of QMetry's database container
qmetryapp_db
Enter the name of QMetry Database container.
Enter current Database Host
-
Enter Database Host Public IP/DNS of QMetry application.
Enter current Database Port
-
Enter Database Port of QMetry application.
Enter current Database User
-
Enter Database username of QMetry application.
Enter current Database Password
-
Enter Database password of QMetry application.
Enter current Database Schema
-
Enter Database schema name of QMetry application.
When the QMetry Upgrade Menu appears again, enter 0 to exit.
Note
The upgrade can take time, depending on the amount of data in the database.
Step 4: Upgrade the QMetry Reports Database
To upgrade the QMetry Reports database, do the following:
Copy
QMetry_Linux_Installer.zipto the server that hosts the report container and the report database container. If you already extracted the installer on this server in Step 3, go to the QMetry_Linux_Installer directory, and skip the next step.Go to the directory that contains the file, and then extract it.
Unzip QMetry_Linux_Installer.zip
cd QMetry_Linux_Installer
Run the script.
chmod +x upgrade.sh
sudo sh upgrade.sh
At the QMetry Upgrade Menu, enter 1 to upgrade the database.
Enter the values described in the table:
Options
Details
Default Value
Example
Enter Report database password for root user
Enter password for QMetry Reports Database.
-
QMetryreports@!Nf0#
Enter Report database schema
Enter Database schema name for QMetry Reports Database.
qtmanalytics
qtmanalytics
When the QMetry Upgrade Menu appears again, enter 0 to exit.
Note
The new report database is available on port 3306 by default. If the script asks whether to force a sync, enter N, because the data is already synchronized.
Step 5: Restart QMetry Services:
To restart the QMetry application and report containers, do the following:
Run the following commands:
docker start qmetry_app_1
docker start qmetry-reports
List the running containers, and ensure that the QMetry application, report, and database containers are running.
docker ps
Step 6: Validate the Upgrade:
To validate the upgrade, do the following:
Confirm that each database container runs MySQL v8.4.8. Replace the container names with the names that docker ps shows. Each command returns a version string that contains 8.4.8.
   docker exec qmetryapp_db mysqld --version
   docker exec qmetry-reports-db mysqld --version
Log in to QMetry, and confirm that your projects, requirements, test cases, and test suites display as expected.
Open QMetry Reports, and confirm that the dashboards load data without errors.
Step 7: Verify Report Synchronization
To verify that report synchronization works correctly, do the following:
In QMetry, edit an existing test asset, for example, a test case.
In QMetry Reports, confirm that the change appears after the synchronization completes.
Get Support
If you encounter any issues during the upgrade, submit a support ticket on the Support Portal.