QMetry Upgrade Document (to the Latest Version)
This document provides step-by-step instructions to upgrade QMetry to the latest version. It includes prerequisites, backup guidelines, and detailed steps to ensure a smooth and successful upgrade process with minimal downtime.
Prerequisites
Before upgrading, ensure the following:
MySQL version of QMetry Reports and QMetry Application is 8.4.8.
Internet connectivity is enabled on the server.
Upgrading the Existing QMetry Installation
To upgrade QMetry to the latest version, perform the following steps:
Step 1: Important: Backing up the Existing QMetry Database
Create a backup of the "qmetry" database. By default, the backup is saved in the /opt directory.
Run the following command to update the username, password, and location of the backup file:
docker exec qmetryapp_db sh -c 'exec mysqldump -uroot -p<password> --triggers --routines --hex-blob --single-transaction --lock-tables --no-create-db qmetry' > /opt/qmetry_backup_<date>.sql
Example 23.docker exec qmetryapp_db sh -c 'exec mysqldump -uroot -pqmetry --triggers --routines --hex-blob --single-transaction --lock-tables --no-create-db qmetry' > /opt/qmetry_backup_2021-01-01.sql
Verify that the database is backed up and is available.
Step 2: Downloading the Upgrade Files
Download the required files by following these steps:
Get the latest version of QMetry Upgrade Installer from the Support Portal.
Download
QMetry_Linux_Installer.zipto the QMetry Application Server on the host machine.
Step 3: Running the QMetry Upgrade
To run QMetry Upgrade, perform the following steps:
List the running containers with the following command:
docker ps
If Docker is not running, use the following command to start it:
docker start qmetry_app_1
Note
Replace the container names with the correct application names as specified in the previous command.
Unzip the file.
unzip QMetry_Linux_Installer.zip
Go to the QMetry directory:
cd QMetry_Linux_Installer
Run the following command to grant execution permissions to the upgrade script.
chmod +x upgrade.sh
Run the following command.
Note
The process may take some time to complete. Kindly be patient and allow it to finish properly.
./upgrade.sh
Confirm the upgrade.
Note
The process may take some time to complete. Kindly be patient and allow it to finish properly.
Options
Type
Default Value
Comments/ Example
Do you want to make an online upgrade (Y/N)?
Mandatory
-
type - Y/N
Type 2 to upgrade QMetry App.
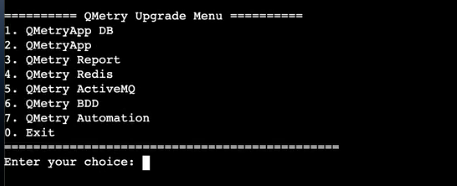
Type 0 to exit the installer.
Step 4: Install or Upgrade QMetry Jira Add-on
Download the correct Jira add-on version that matches your QMetry version. Refer to the table below to find the compatible Jira add-on version based on your QMetry version.
QMetry Version | Jira-addon version required |
|---|---|
8.29.x | 2.4.6_jira10 (Jira Version 10x), 2.4.6 (Jira Version 11x) |
8.28.x | 2.4.5_jira10 (Jira Version 10x), 2.4.5 (Jira Version 11x) |
8.27.x | 2.4.3_jira10 (Jira Version 10x), 2.4.3 (Jira Version 11x) |
8.26.x | 2.4.2_jira10 (Jira Version 10x), 2.4.2 (Jira Version 11x) |
8.25.x | 2.4.1 (Jira Version 11x), 2.4.1_jira10 (Jira Version 10x) |
In case you have not installed the QMetry Jira Integration app for integration, follow the Steps to Install and Configure QMetry Jira Integration if it is not installed.
If you are facing any issues during the upgrade process, generate a support ticket on Support Portal for assistance.